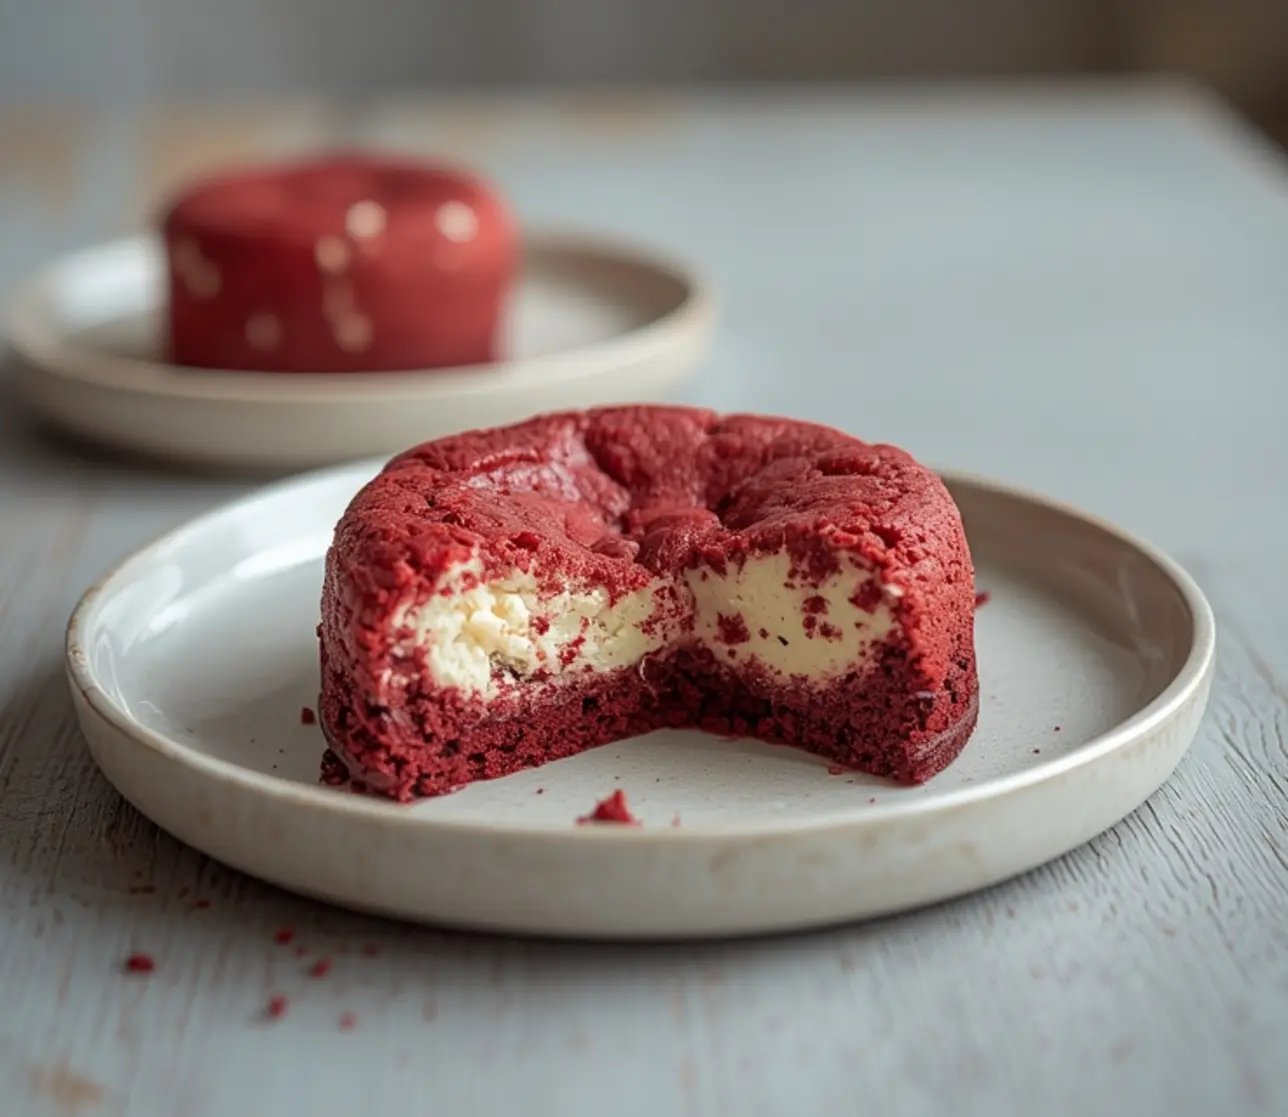
Looking for something special to bring to your next get-together? I’ve got you covered. These easy mini red velvet cheesecakes are the perfect little bites of creamy goodness that fit right in the palm of your hand. They bring together that nostalgic red velvet flavor with a rich, velvety cheesecake texture that feels indulgent without being overwhelming. It’s the kind of recipe that feels fancy but comes together right in your own home kitchen, no professional training required.
I grew up thinking that a good dessert had to be a showstopper, but it also had to taste like home. These mini cheesecakes hit that mark every time. Whether you’re planning holiday baking or just need a sweet treat to brighten a weekday, this recipe offers that balance of simple preparation and spectacular flavor. They are truly bite-sized treats that everyone will ask you to make again.
What You Need for Mini Red Velvet Cheesecake Ingredients
The magic of this recipe lies in the simplicity of the ingredients. You don’t need a long list of complicated items; just the basics that work in harmony. We start with a classic graham cracker base, but you can easily swap that for crushed Oreos if you want a chocolate cookie crust.
For the filling, we use cream cheese, sugar, and a splash of vanilla to create that familiar tangy cheesecake profile. The red velvet comes from a bit of cocoa powder and red food coloring, giving it that signature color and subtle chocolate flavor. It’s a combination that feels classic yet exciting every time you make it.
This ingredient list is straightforward, making it accessible for even the busiest home cook. You can find everything you need at your local grocery store without hunting for obscure items. That’s the beauty of this approach-focusing on quality ingredients that come together easily.
I love using full-fat cream cheese for the best texture, but you can certainly experiment with lighter versions if you prefer. The key is to make sure everything is at room temperature before you start mixing. This ensures a smooth, lump-free batter that bakes up perfectly creamy.
Timing and Temperature for Perfect Mini Cheesecakes
When it comes to baking, timing is everything, especially with cheesecakes. These mini versions are a lifesaver for busy schedules because they bake much faster than a traditional large cheesecake. You’re looking at about 15 minutes of active prep time and roughly 25 minutes of bake time.
The total time from start to finish is under an hour, which makes these easy mini red velvet cheesecakes perfect for last-minute guests or a quick weeknight dessert project. I usually set aside about 45 minutes total to account for preheating the oven and letting them cool slightly before serving.
Baking at 325°F (160°C) is the sweet spot for cheesecakes. This moderate temperature allows the centers to set gently without cracking or drying out. You’ll know they’re done when the edges are set but the center still has a slight jiggle to it.
Don’t rush the cooling process! Letting them rest in the oven with the door cracked for 10 minutes helps prevent temperature shock, which can cause cracks. Then, transfer them to a wire rack to cool completely before chilling in the fridge.
How to Make Mini Red Velvet Cheesecakes Step by Step

Start by preheating your oven to 325°F and lining a standard muffin tin with paper liners. This setup makes removing the cheesecakes effortless later on. In a small bowl, mix your graham cracker crumbs with melted butter and a touch of sugar until it resembles wet sand.
Press about a tablespoon of this mixture firmly into the bottom of each muffin cup. Use the back of a spoon or a small glass to pack it down tightly. This creates a solid base that won’t crumble when you bite into it.
For the filling, beat the softened cream cheese until it’s completely smooth and free of lumps. This step is crucial for that luxurious texture we’re after. Then, add the sugar, vanilla, and cocoa powder, mixing until just combined.
Next, blend in the egg until it’s incorporated, but be careful not to overmix. Overbeating can incorporate too much air, leading to puffs and cracks during baking. Finally, gently stir in the red food coloring until you achieve that vibrant red velvet hue.
Spoon the batter evenly over the prepared crusts, filling each liner about three-quarters full. This leaves room for them to rise slightly without overflowing. Pop the tin into the oven and bake for 20-25 minutes, watching for that set edge with a slight wobble in the center.
Once baked, turn off the oven and crack the door open. Let the cheesecakes sit inside for 10 minutes before transferring them to a wire rack. Cool completely before chilling in the refrigerator for at least 2 hours to firm up.
Why You’ll Love These Mini Red Velvet Cheesecakes
You’ll love these because they offer the best of both worlds: the tangy richness of cheesecake and the festive charm of red velvet. They are perfectly portioned, making it easier to enjoy a treat without overindulging. Plus, they look absolutely stunning on a dessert platter.
The mini cheesecake recipe approach means no slicing or serving hassle-just grab and go. This is ideal for parties where you want to offer something elegant without the mess of a whole cake. The creamy texture paired with the crunchy crust is a satisfying contrast in every bite.
These also double as fantastic red velvet desserts for any occasion, from birthdays to Valentine’s Day. They fit right into the category of holiday baking ideas, offering a festive touch that guests will appreciate. And because they are bite-sized treats, you can easily customize them with different toppings.
The flavor profile is balanced-sweet but not cloying, with a hint of chocolate that isn’t overwhelming. It’s a crowd-pleaser that appeals to both kids and adults, making it a reliable choice when you need a dessert that everyone will enjoy.
Fun Variations for Your Red Velvet Cheesecake Bites

Get creative with your toppings! A dollop of whipped cream and a fresh raspberry on top adds a refreshing contrast to the creamy cheesecake. You could also drizzle a little white chocolate ganache for an extra touch of decadence.
If you’re looking for a different crust, try swapping the graham crackers for crushed vanilla wafers or even gluten-free cookies. For a dairy-free version, use your favorite plant-based cream cheese and butter alternatives. The recipe adapts well, so don’t be afraid to experiment.
Serving these as part of a larger spread of creamy dessert snacks makes for a beautiful dessert table. You can also make them ahead of time, which is a huge plus during the busy holiday season. These mini red velvet cheesecakes hold up well in the fridge for several days.
For a festive twist, add a little peppermint extract to the batter and top with crushed candy canes during the winter holidays. Or, mix in some mini chocolate chips for added texture. The possibilities are endless when you start with this solid base recipe.
Common Mistakes to Avoid with Mini Cheesecakes
One common mistake is using cold ingredients straight from the fridge. This can lead to a lumpy batter that doesn’t bake smoothly. Always let your cream cheese and eggs come to room temperature for the best results.
Another pitfall is overbaking. Cheesecakes continue to set as they cool, so if you bake them until they’re completely firm in the oven, they might turn out dry. Pull them out when the center still has a slight wobble for that perfect creamy texture.
Skipping the water bath is usually not necessary for mini cheesecakes, but be mindful of the oven temperature. Too high, and you risk cracks or a rubbery texture. Sticking to 325°F ensures gentle, even cooking.
Finally, don’t skip the chilling step. These easy mini red velvet cheesecakes need time in the fridge to firm up and develop their flavors. Rushing this step might leave you with a soft, hard-to-handle dessert that doesn’t slice cleanly.
Storing and Reheating Your Cheesecake Bites
Store your cheesecake bites in an airtight container in the refrigerator. They will stay fresh for up to 5 days, making them a great make-ahead option for busy weeks. Just be sure to separate layers with parchment paper to prevent sticking.
If you want to keep them longer, these mini cheesecakes freeze beautifully. Wrap each one individually in plastic wrap and place them in a freezer-safe bag. They can last up to 3 months in the freezer.
When you’re ready to serve, thaw them overnight in the refrigerator. For the best texture, enjoy them chilled straight from the fridge-no reheating needed. The creamy filling is perfect when cool, and the crust maintains its crunch.
Meal-prepping these for the week is a smart move. Portion them out for a daily sweet treat that feels like a special indulgence. Having them on hand makes it easy to satisfy a dessert craving without reaching for store-bought options.
Enjoy Your Homemade Mini Red Velvet Cheesecakes
There’s something truly special about making desserts from scratch, and these mini red velvet cheesecakes are a testament to that joy. They bring a touch of elegance and a burst of flavor to any gathering, yet they’re humble enough for a quiet night in.
I hope you feel inspired to whip up a batch this weekend. Share them with friends, family, or just keep them all to yourself-no judgment here! Baking is about connection, and every bite of these little treats is a reminder of that.
Happy Cooking, David Rivera.
Nutrition Facts (Per Serving)
Easy Mini Red Velvet Cheesecakes for Holiday Baking
Equipment
- Muffin Tin
- Electric mixer
Ingredients
Main Ingredients
- 8 oz cream cheese softened
- 1/2 cup sugar
- 1 cup red velvet cake mix dry
- 1 large egg
- 1/4 cup sour cream
Instructions
- Preheat your oven to 325°F and line a muffin tin with cupcake liners.
- In a bowl, beat the cream cheese and sugar until smooth and creamy.
- Add the egg, sour cream, and dry red velvet cake mix, mixing until fully combined.
- Spoon the batter into the liners, filling each about 3/4 full.
- Bake for 18-20 minutes until the centers are set but slightly jiggly.
- Cool completely in the pan, then refrigerate for at least 1 hour before serving.
Frequently Asked Questions
Can I substitute the cream cheese in the mini red velvet cheesecakes?
Yes, you can use a dairy-free cream cheese alternative for a lactose-free version. The texture will remain creamy, but the tangy flavor might be slightly different. Ensure the substitute is suitable for baking to maintain the structure.
How should I store leftover easy mini red velvet cheesecakes?
Store them in an airtight container in the refrigerator for up to 4 days. This keeps the creamy goodness fresh and prevents them from drying out. For longer storage, freeze them for up to 2 months.
Can I make these mini cheesecakes ahead of time for a holiday party?
Absolutely, these are perfect for holiday baking and can be made up to 2 days in advance. Prepare and bake them, then refrigerate until serving. This makes them an ideal make-ahead snack or dessert.
What is the best way to reheat these mini cheesecakes?
These mini cheesecakes are best served chilled or at room temperature, so reheating isn’t necessary. If you prefer them warm, let them sit out for 10-15 minutes before serving. Avoid microwaving to preserve the creamy texture.
What are some serving suggestions for these red velvet cheesecakes?
Serve them on a festive platter for holiday gatherings, or pair with fresh berries for a colorful contrast. They are also great as bite-sized dessert snacks for parties. Drizzle with a white chocolate glaze for extra elegance.
Have more questions? Leave a comment below and we will help you out!