Pesto Chicken Sliders are my go-to solution when I need something impressive but have almost no time to cook. After years of juggling family schedules and last-minute dinner requests, I’ve learned that the best recipes are the ones that deliver big flavor without fuss. These little sandwiches are exactly that—quick, satisfying, and always a hit. I’ve tested this method countless times to ensure the chicken stays juicy and the pesto doesn’t get lost in the oven. Whether it’s a busy weeknight or a casual gathering, this recipe comes through. It’s one of those Pesto Chicken Sliders that feels special but fits into any hectic day. You’ll find it’s a fantastic option for pesto chicken sliders and other quick dinner ideas.
Ingredients & Equipment
The magic of this recipe lies in using good quality prepared pesto. While I love making pesto from scratch, the store-bought version is a brilliant shortcut for those 15-minute meals. Look for one with bright olive oil and parmesan flavor. For the chicken, boneless, skinless thighs are my preference because they’re forgiving and stay moist. Breasts work too, but watch the cooking time closely to avoid dryness. You’ll also need Hawaiian rolls for their sweet, soft texture that complements the herby pesto perfectly.
For equipment, you don’t need anything fancy. A simple baking sheet or sheet pan is essential. I prefer a half-sheet size, which gives the sliders enough room to toast without crowding. You’ll also need a small bowl for mixing the chicken and pesto, and a sharp knife for assembly. A pastry brush helps if you want to add a buttery glaze, though it’s optional. This setup keeps the process streamlined for making easy dinner recipes on a busy night.
Prep & Cook Time
 2")
Timing is everything for a true 15-minute meal. The active prep takes about 10 minutes—this includes shredding the rotisserie chicken, mixing it with pesto, and splitting the rolls. The cooking time is just 5 minutes under the broiler to melt the cheese and toast the rolls. I’ve timed this recipe multiple times, and it consistently fits the “15 minute meals” claim. It’s faster than ordering delivery and feels far more rewarding. These Pesto Chicken Sliders are designed for speed.
Difficulty level is beginner-friendly. The only cooking technique involved is heating the chicken mixture and broiling the buns. If you can use an oven broiler and mix ingredients in a bowl, you can master this. The steps are simple and foolproof, making it an ideal recipe for novice cooks or anyone seeking quick lunch options. This simplicity is what makes it such a reliable choice for weeknight easy dinner ideas.
Step-by-Step Instructions
 3")
Start by preheating your oven’s broiler to high. Position an oven rack about 6 inches from the heat source—this ensures the rolls toast quickly without burning the bottoms. While the oven heats, slice your Hawaiian roll pack horizontally in one piece, creating a top and a bottom slab. Place the slab, cut-side up, on a parchment-lined baking sheet. This prep step is key for a smooth assembly of your Pesto Chicken Sliders.
In a medium bowl, combine the shredded rotisserie chicken with your pesto. Start with 1/2 cup of pesto and add more if the mixture seems dry. I find 3/4 cup is usually perfect for 2 cups of chicken. Stir until every strand of chicken is coated. Taste and adjust seasoning with salt and pepper if needed. The pesto carries most of the salt, so be mindful.
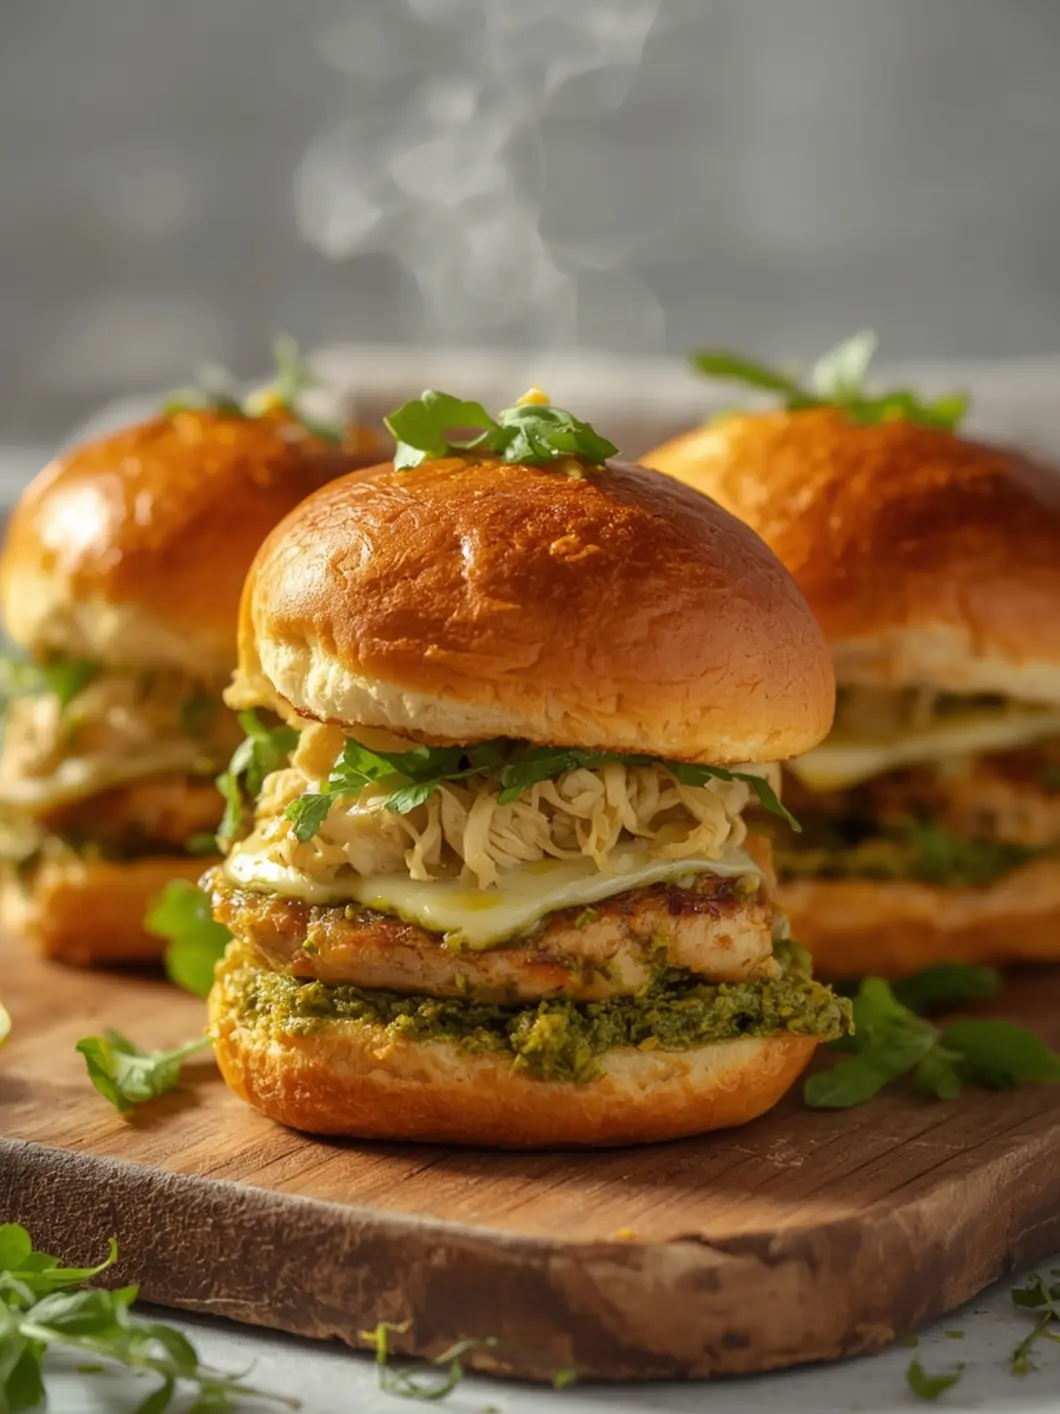
Arrange the bottom bun slab on the baking sheet. Spread the pesto chicken mixture evenly over the buns, making sure to go all the way to the edges. Top with slices of provolone cheese, covering the entire surface. This creates a protective layer that melts down into the chicken, keeping it moist.
Carefully place the baking sheet under the broiler. Broil for 2-4 minutes, watching closely. The cheese should be fully melted and bubbly, and the edges of the rolls should turn golden brown. Ovens vary, so keep an eye on it to prevent burning.
Remove the sheet from the oven and place the top bun slab on, cut-side down. If you like, you can brush the tops with melted butter mixed with garlic powder for extra flavor, but it’s not necessary. Press down gently to help everything adhere. Use a sharp serrated knife to cut individual sliders. Wipe the blade between cuts for neat presentation.
Why You’ll Love This Recipe / Health Benefits
 4")
These pesto chicken sliders are a balance of smart nutrition and satisfying taste. Pesto is made from basil, which is rich in vitamins K and A, while the olive oil provides heart-healthy monounsaturated fats. Chicken is a lean protein source, essential for muscle repair and keeping you full longer. By using a good quality store-bought pesto and lean chicken, you create a meal that’s nourishing without feeling heavy.
They’re incredibly versatile for different occasions. I often make a batch for Pesto Chicken Sliders as an easy dinner, but they also shine as party sliders or a quick lunch. The portion control of sliders helps manage serving sizes naturally. You get the comfort of a sandwich with the benefit of a protein-forward meal. This fits perfectly into the category of 15 minute meals that nourish.
The flavor profile is a winner for picky eaters, especially kids. The slight sweetness of the buns balances the herbal pesto. There’s no complicated texture or weird ingredients, just familiar, comforting flavors in a fun, bite-sized package. It’s a recipe that delivers both on taste and practicality, proving that healthy eating doesn’t have to be boring or time-consuming.
Variations, Substitutions, or Serving Suggestions
 5")
For a different twist, try swapping the provolone for mozzarella for an extra gooey pull, or add a layer of sun-dried tomatoes for a punch of sweetness and acidity. If you’re making Hawaiian roll sliders, a drizzle of balsamic glaze after broiling adds a lovely finishing touch. These small changes can elevate the dish for different palates.
If you need a gluten-free version, simply use your favorite gluten-free slider buns. The chicken filling is naturally gluten-free. For a vegetarian adaptation, replace the chicken with hearty white beans or chickpeas mashed with pesto. It’s a delicious way to adapt the base concept. The core of chicken sandwiches like this is the adaptable filling.
Serving suggestions are endless. These sliders pair wonderfully with a simple arugula salad tossed with lemon vinaigrette, or a side of crispy roasted potato wedges. For a game-day spread, arrange them on a large platter with various dipping sauces like ranch or marinara. They’re the perfect centerpiece for a casual meal, especially when you’re short on time but want a complete easy dinner.
Common Cooking Mistakes to Avoid
 6")
The most common error is using chicken that’s already dry. If you’re using leftover baked chicken breast, add an extra spoonful of pesto or a drizzle of olive oil to the mix. Moisture is crucial for a great slider. A dry filling makes for a disappointing eating experience, even with the best toast.
Another mistake is overcrowding the baking sheet. Give your sliders space. If the buns are too close together, they steam instead of toast, and you won’t get that desirable golden crust. This is especially important for quick lunch ideas where speed and texture are key.
Finally, don’t walk away from the broiler. It goes from perfect to burnt in seconds. The 2-4 minute window is short, and your full attention is needed. This vigilance is what ensures your Pesto Chicken Sliders come out perfectly every time, avoiding that common kitchen pitfall of scorched food.
Storage & Reheating Tips
Leftover Pesto Chicken Sliders can be stored, but for the best quality, I recommend storing components separately if possible. If the sliders are assembled, wrap them tightly in foil or plastic wrap and store in the refrigerator for up to 2 days. The buns will soften, but they will still taste good.
For reheating, avoid the microwave if you want to keep the buns somewhat crisp. The best method is to place them in an air fryer or a conventional oven at 350°F (175°C) for about 5-7 minutes. This helps re-crisp the bottom of the bun and re-melt the cheese. Microwaving will make them soft and steamy, which is fine for speed but less ideal for texture.
If you’ve prepped the chicken filling in advance, it keeps well in an airtight container in the fridge for up to 3 days. When you’re ready to make your party sliders or a quick meal, just scoop the filling onto the rolls and broil as directed. This makes it an excellent component for meal prep and keeps the assembly time minimal.
Conclusion
In the realm of 30-minute meals, these Pesto Chicken Sliders stand out for their speed, flavor, and crowd-pleasing appeal. They solve the daily “what’s for dinner” dilemma with a recipe that’s both elegant and effortless. From the moist, herby chicken to the golden, soft buns, every element comes together quickly for a result that feels thoughtfully made.
I rely on recipes like this because they prove that homemade food can be fast and fantastic. You don’t need to sacrifice quality for convenience. These sliders are a testament to that, fitting perfectly into a busy lifestyle while delivering on taste and nutrition. They are a reliable tool in any home cook’s arsenal for busy weeknights or last-minute gatherings.
Keep this recipe in your back pocket for when life gets hectic. It’s a perfect example of a dish that’s greater than the sum of its parts. With simple ingredients and straightforward steps, you can create a memorable meal in under 30 minutes. It’s the kind of cooking that makes everyone happy, including the cook.
FAQs
Can I make Pesto Chicken Sliders ahead of time?
You can prepare the chicken mixture up to a day in advance and store it in the fridge. For the best texture, assemble and broil the sliders right before serving. The broiled buns don’t hold up well if made hours ahead.
What’s the best substitute for rotisserie chicken?
If you don’t have rotisserie chicken, you can use cooked, shredded chicken breasts or thighs. Poach them for 15-20 minutes in seasoned water until cooked through, then shred. A can of drained, shredded chicken works in a pinch for ultra-quick 15 minute meals.
Are these sliders spicy?
No, the standard recipe is mild and herb-forward. If you like a little heat, add a pinch of red pepper flakes to the pesto-chicken mixture or use a spicy pesto variety.
Can I use homemade pesto?
Absolutely. Homemade pesto is fantastic in this recipe. It often has a brighter, fresher flavor that really shines. If you have the time, making a fresh batch elevates these chicken sandwiches to another level.
How do I prevent the sliders from getting soggy?
To avoid sogginess, ensure your chicken mixture isn’t overly wet. Let any broiling steam escape by not covering the sliders immediately after they come out of the oven. If using leftover rolls, you can toast the inside of the buns lightly before adding the filling.
Easy Pesto Chicken Sliders (15-Minute)
Equipment
- Large Skillet
- Sharp knife
- Cutting Board
Ingredients
Main Ingredients
- 1 lb chicken breast boneless, skinless, sliced into cutlets
- 1 tablespoon olive oil
- 1 package Hawaiian sweet rolls 12 count
- 1/2 cup basil pesto store-bought or homemade
- 6 slices mozzarella cheese provolone works too
Seasoning
- 1/2 teaspoon garlic powder
- 1/2 teaspoon salt
- 1/4 teaspoon black pepper
Butter Topping
- 2 tablespoons butter melted
- 1/2 teaspoon garlic powder
- 1 tablespoon fresh parsley chopped, optional garnish
Instructions
- Prep the chicken by slicing the chicken breasts horizontally to create thin cutlets about 1/2 inch thick. Pat dry with paper towels and season both sides with garlic powder, salt, and pepper.
- Heat olive oil in a large skillet over medium-high heat. Once shimmering, add the chicken cutlets. Cook for 4-5 minutes per side until golden brown and cooked through (internal temp 165°F).
- Assemble the sliders: Slice the entire slab of Hawaiian rolls in half horizontally. Place the bottom half on a baking sheet or serving platter.
- Spread a generous layer of basil pesto over the bottom buns.
- Layer the cooked chicken cutlets on top of the pesto. You may need to cut them to fit the rolls.
- Top the chicken with mozzarella cheese slices.
- Place the top buns on. Mix melted butter with garlic powder and brush generously over the tops of the buns.
- Serve immediately while the chicken is hot and cheese is melty, or cover with foil and warm in a 350°F oven for 5 minutes if you prefer them melted together.